Tag Archives: diy

{diy} hairpin leg coffee table.

we’ve been buying a lot of furniture over the past month or so, and a new coffee table for our living room was sort of the last big piece we felt like we needed within the near future. (our old coffee table is currently standing in as a tv stand in the basement). not really happy with any of the options (or prices) we were seeing for coffee tables at various places, i thought about how i’d always wanted to make or have a piece of furniture with hairpin legs. after a quick browse through pinterest, i discovered many iterations of this table and figured it would be pretty simple to make. and i was right! i’m proud to say that this table is being brought to you from kevin and i argument-free and that we remain happily married after assembling it. (the same can’t be said for many, many ikea and target items). so, if you’re in the market for a coffee table (or a number of other kinds of tables – the size and height of this is easily adapted), and have a few hours to spare over a weekend, read on!

materials needed:
-1 piece of wood – size could vary greatly; we got a 3/4″ piece of pre-cut pine from lowe’s that is 24″ x 48″ and we’re very happy with the size; you could also cut a piece this size in half and make two square end tables
-4 1/2″-thick, 16″ tall hairpin legs (we ordered these)
-1 8-oz can of wood stain in your desired color (optional)
-1 8-oz can of polyurethane (if you like the stain of your wood as-is, you could skip the can of stain and go straight to poly)
-foam brush or rags for staining and sealing
-12 screws (you’ll want ones that are about as long as your wood is deep – ours were 3/4″)
-drill, screwdriver
-a well-ventilated area

instructions:

lay your wood on some cardboard or newspaper to keep your floors clean of stain and poly. following the instructions on the can, apply a thin coat of stain to your wood, making sure to get the sides as well (we just stained the top and sides, and didn’t worry about the “bottom”). allow to dry for recommended time, then apply a second coat if desired. allow that to dry, and then move on to the poly, again following the instructions on the can. if you want to really seal your table and make it more waterproof, apply a few coats of poly over the next few days, allowing each coat to dry for about a day. wait about a day after your last coat of poly to move on to the next steps.

we placed our legs slightly inward of the edges. why? because my dad did that once when he helped us with another table and kevin remembered that and thought it was important so we did it. who really knows. we are the two least handy people on the planet so we aren’t really in the business of not heeding such sage advice.

power tools! my favorite part.

self-explanatory.
flip it over, dust it off, and voila, a new coffee table!

(sorry for the poor lighting of the final picture – this is what happens when you’re rushing to finish a blog post in the early morning before work and it’s october and the sun doesn’t rise until 7:30)

i estimate that this whole project cost us right around $120 – about $85 for the legs + shipping, and the remainder in supplies and of course, the wood. it could be even cheaper if you skipped the stain and had some screws lying around. regardless, it’s a much more affordable option than lots of other coffee tables out there, and it’s custom-made which is much more personal and special. hoping to do a full living room tour soon! send us photos if you decide to make anything with hairpin legs!

Posted in house + home | Tagged , , | 3 Comments

{diy} pourover coffee station.

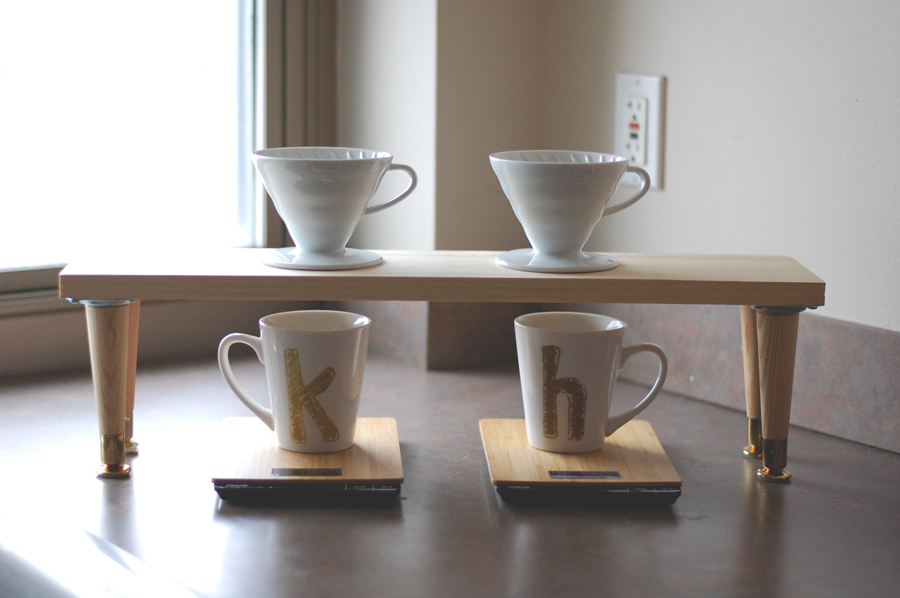
you may have seen our instagrams from last weekend of the diy pourover coffee station that we made, and are pretty proud of (it actually stands up! and there were no drilling injuries! successes in and of themselves, for sure). if you don’t know about pourover manual brewing yet, it’s a wonderful alternative for drip coffee and the taste is infinitely better. you can read all about the methodology and watch some how-to videos in this article from sweet maria’s and this guide from prima coffee.

there are lots of different pourover drippers on the market, but we really like the hario v60 and decided to invest in a couple of those in order to make this station. the prima coffee guide linked above lists the pros and cons of lots of different models, so check it out if you’re thinking of buying one. we’ve also heard good things about the beehouse dripper and have seen them in lots of specialty coffee shops.

after seeing these pourover stations in chicago and on our coffeecation in kansas city, we really wanted to make our own. we found a couple different tutorials but most of them were more complicated than we were looking to get. we ultimately settled on this simple design that only cost about $40 total to make.

materials needed:
-four 6″ wooden table legs (we used these)
-four steel mounting plates (we used these)
-one 1 x 6 x 24″ piece of wood  (we found a nice piece of pine in this exact size at ace for about $5)
-2 1/2″ hole saw
-polyurethane for sealing
-2 hario v60 ceramic drippers (size 02)*

*as mentioned above, there are lots of pourovers drippers on the market, the hario v60 only one of them. follow the same process if using another dripper, but make sure you measure the circumference of its opening and purchase the corresponding hole saw.  

how-to:
1. determine where your holes will be on your piece of wood, and mark them. we made the center of each hole 8″ in from either side, but this is obviously flexible depending on how you want your station to look. we found it easiest to actually trace the entire circle using the dripper once we found our centers.
2. drill the two holes with the hole saw (a little trick: drill until the bit pokes out on the underside, then turn the wood over and drill down again. we found this to be a little easier and it also makes sure the wood chunk won’t get stuck in the hole saw once you’re done)
3.  turn your wood onto its bottom side and pre-drill holes for the mounting plates in each of the four corners. after pre-drilling, hold down the mounting plate against the wood and screw it in. repeat until all four mounting plates are securely screwed into the wood.
4. screw the legs into each of the four mounting plates.
5. seal the top and legs with polyurethane and allow to dry completely.
6. place hario drippers in each of your perfectly-drilled holes.
7. make and enjoy delicious coffee!

scales / american weigh scales via amazon
mugs / bed bath & beyond
swanneck kettle (not pictured, but you’ll want one of these, i promise) / bonavita via amazon

Posted in house + home | Tagged , | 2 Comments

{diy} how to make a simple upholstered headboard.

headboard-01

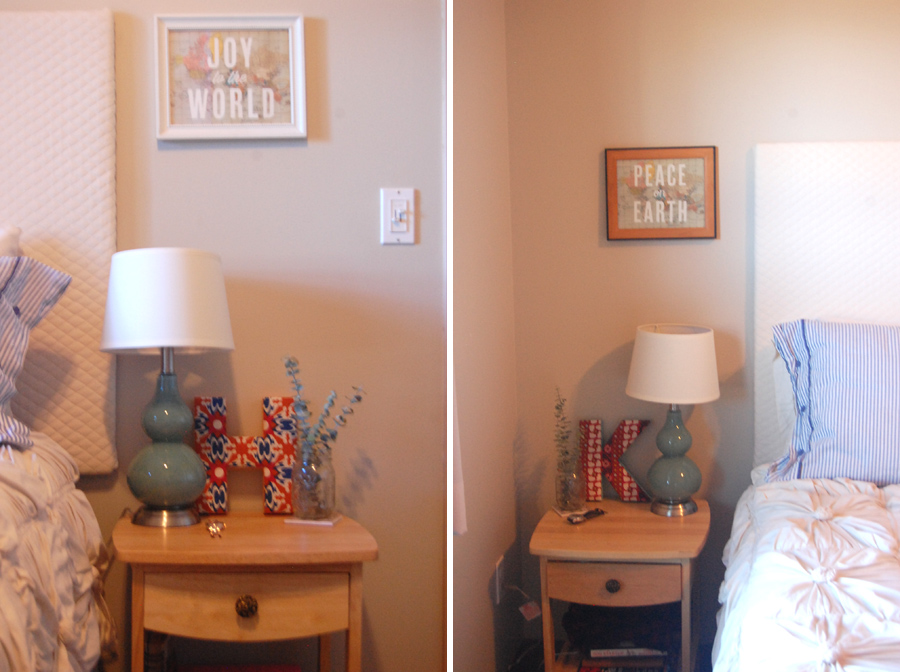
when i was trying to figure out what to post about this week, i remembered that we made a new headboard for our bedroom a few months back but never got around to posting the photos and tutorial. since then, we’ve done a little more work on our bedroom and now have matching nightstands and cute new lamps, so i figured it might be a good time to showcase this project!

you may have seen the headboard project that we constructed for our apartment in tucson, but sadly it didn’t make the move with us. another headboard look that i’ve always loved is the upholstered headboard on design*sponge seen below. while i knew we couldn’t do anything quite that fancy, i figured we could use the same principles to do something much simpler that would work for our new space.

here is what you’ll need in order to make one of your own:
one piece of plywood (ours was 3/4″ thick), cut to 36″ (width) x 62″ (height) [these measurements are for a queen bed. for a larger or smaller bed, you’ll want to measure the width of your bed and then add a few inches on each side to get your own width]
quilted batting: we bought ours at hobby lobby in a 72×90″ size bag. just make sure you get enough to cover the surface area of your piece of plywood plus a few extra inches on each of the four sides for stapling down
fabric of your choice: you can literally choose anything you like – a solid color, a pattern, whatever you like. we went with a cream colored quilted-esque fabric because we weren’t sure what colors we would end up using in our bedroom and i wanted it to be neutral. the quilted texture of the fabric makes it a little bit more exciting than just a solid cream color, though. again, make sure you have enough to cover the surface area of your plywood plus extra for stapling
staple gun & extra staples
canvas hanger for up to 100 lbs; there’s probably a variety of things that would work to secure this type of headboard to the wall, but this is what worked for us. one side goes onto the wall, and the other side goes onto the back of the headboard, and they just slide in together. we usually struggle with getting things on the wall straight, but this actually was very simple.

once you’ve gathered all your materials together, you’re ready to begin! this works best if you have two people, so don’t try to do it on your own.

1. lay out your batting on the floor and place your headboard on top of it. if you have a lot of extra batting on the sides, you can cut some off, but you will want at least a few inches hanging off on each side in order to staple down.


2. next, one person should hold down and pull the batting taught while the other person staples the batting to the plywood. keep repeating this process until the batting is stapled down along all four sides of the plywood. it should look like the photo below after you complete this step.

3. prepare your fabric: most likely you’ll need to at least iron it, and maybe even give it a quick lint roll. once it’s all straightened out and cleaned off, repeat the batting process with the fabric; lay the fabric down on the floor and place the headboard on top, then secure the fabric to the plywood using the staple gun.

4. all that’s left now is to hang it up on the wall! follow the instructions on the mount or hanger that you purchased, and voila! you’re done. again, we recommend the canvas hanger that we used and that’s pictured above. we marked where we wanted it on the wall beforehand, but the great thing is if it ends up in a slightly different spot from where you intended, you can just scoot your bed over a couple inches and nobody will know.

headboard-02

i love how simple and basic this headboard is; since it’s a neutral color, we can feel free to change out the rest of the decor in our bedroom at any time and know that all the colors will still work together. or, if we ever decide we want to change the headboard itself, we could simply staple down another cut of fabric over it for a whole new look!

Posted in house + home | Tagged , | 2 Comments

simple christmas decor + free printable!

one of my close friends from creighton, kitzi, is currently serving as a volunteer in bolivia, and recently contacted me to see if i’d like to join her in a challenge to decorate our homes for christmas utilizing materials that we already owned. since she doesn’t have access to most christmas decorations where she’s living, but still wanted to make her home feel festive, she thought it would be a fun idea to use as many recycled, already owned objects as possible. she asked me to join in, and since we have a pretty small space and try not to acquire too many new items, it made sense to me!

since we live in a glorified dorm room and can’t always make the changes we’d like to, we’re always looking for non-destructive ways to modify our space (i.e. things that minimize nail and screw holes, etc.) i’ve seen before where people use pant hangers as an alternative to frames to hang posters and photos, and after realizing that (a) we had a lot of unused pant hangers, and (b) there are a ton of free christmas poster printables online, the next step seemed obvious!


we have a large wall in our living room, and decided to take down the photos and prints that normally hang there in order to make room for these christmas prints. we opted to go a little crazy and cover the entire wall with prints, but you could hang just a couple. originally i thought we’d just hammer in a nail to hang each one on, but when we tried that, the hanger hung crooked on the wall. it could be the type of hangers we have, or maybe it’s just physics. (i wasn’t very good at physics). anyways, i would recommend using something like double-sided photo mounting strips instead. we’ve had ours up for about a week, and they’ve stayed up no problem.

in case you’re wanting to download a few of these for your own home, here’s where you can find them all:
top row: 1 / 2 / 3 / 4 / 5
middle row: 1 / 2 / 3 / 4 / 5
bottom row: 12 / 3* /4 / 5

*the “eat drink be merry” print seen in the bottom row was designed by me, and if you’d like, you can download your very own for free, in either red or green! (if you do download it, i’d love to see how you use it to decorate you home for christmas, so please share a photo or instagram if you think of it).


download merrygreen / download merryred

i hope you enjoy the free print, and please share any of your own inexpensive decorating ideas in the comments. i have a few other simple, homemade ideas that we’ve incorporated into our christmas decor this year that i’ll be sharing over the next couple weeks!

Posted in house + home | Tagged , | 2 Comments

{diy} wooden frame instagram display.

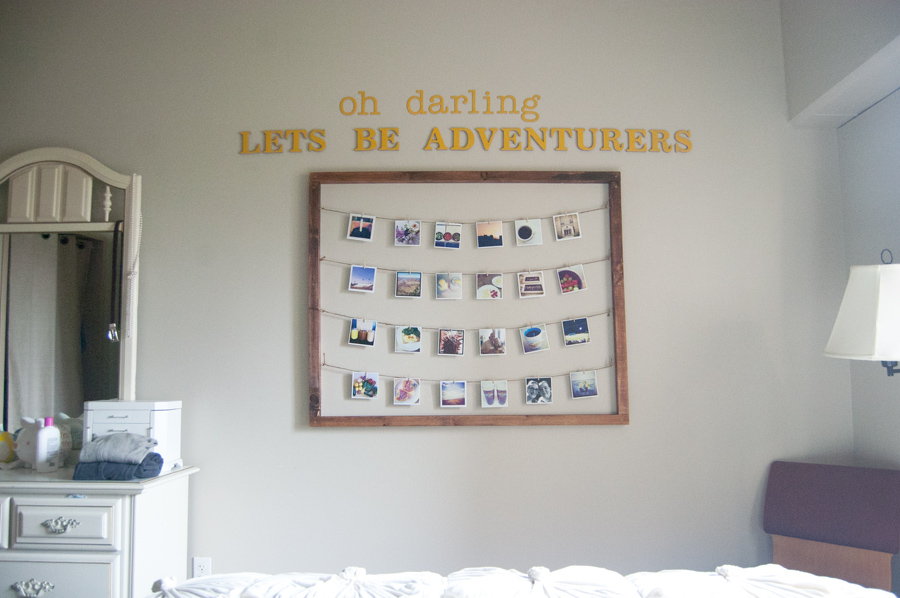
after almost five months of living in omaha, we’re finally feeling pretty settled in and have decorated and organized most of the apartment. last weekend, we figured we’d start to tackle the last of the spaces, our bedroom. specifically, the wall opposite our bed is huge and had nothing on it, so we were always staring at a boring blank, ugly-cream color wall. we wanted to do something simple, but that felt more homey and inviting so we could spend more time reading in our room during the cold months versus surrendering to the tivo every night.

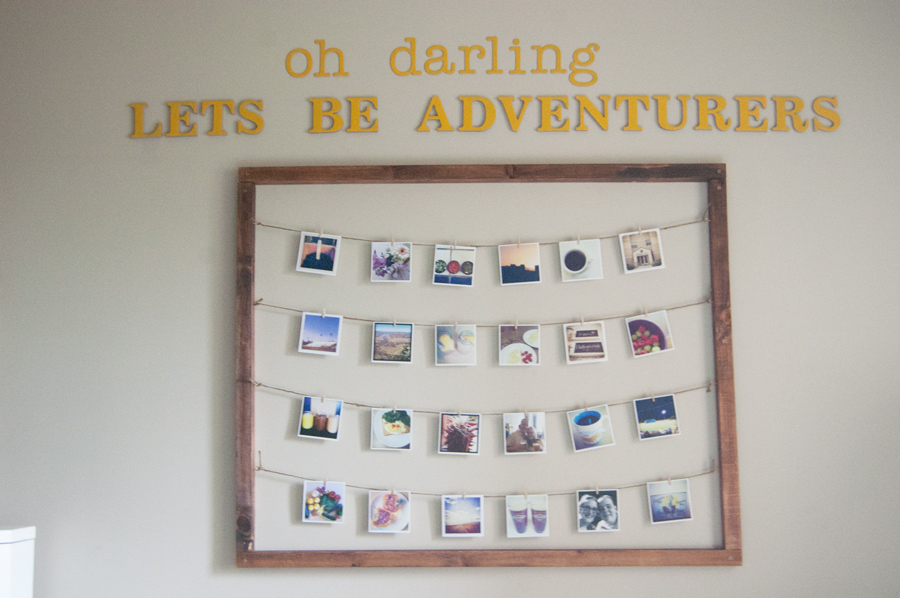
we perused pinterest for ideas, but we didn’t love anything. we shopped around at a few places for inspiration, and even braved the grand opening of omaha’s first home goods (a mistake), but we still couldn’t decide on anything. eventually, i remembered that we had ordered prints of some of our instagrams over the summer, but never decided on where/how to display them. i also remembered seeing a few ideas on pinterest of people creating/buying frames and using string to hang their instagrams/polaroids, and we decided that would be perfect for our space! we searched for a cool vintage frame at a few thrift stores, but ultimately realized we could create the same effect by using cheap lumber and saving quite a bit on the project. we are pleasantly surprised by how well it turned out, and with the addition of “oh darling let’s be adventurers” (quote inspired by this blog), we are totally loving our new wall!

read on for materials needed and the how-to! 

materials needed:
 -two 2x2x8" pieces of lumber, cut to two 36" pieces and two 48" pieces (you'll have a little extra piece) or the size of your choice
 -small can of wood stain in your color choice (we used this one)
 -8-12 gold screws (drywall screws work, too, but the gold ones look nicer)
 -3 1/2" uppercase chipboard letters to spell out quote/words of your choosing (these are what we used for the "let's be adventurers" line)
 -3" lowercase chipboard letters to spell out quote/words of your choosing (these are what we used for the "oh darling" line)  -small tube of craft paint in your color choice
 -mounting tape (the roll works better than the squares since you'll end up cutting it)
 -twenty-four 1" mini clothespins
 -twenty-four polaroid style photos (we ordered from prinstagr.am, but you can follow this tutorial for printing your own)
 -twine or string for hanging photos
 -eight 5/8" gold cup hooks 
 -tools: level, screwdriver, small handheld drill

instructions:
1. lay out your four pieces of wood on newspaper and stain the three sides that will be showing. we didn’t want our wood to be too dark, so we just did one coat and wiped it off fairly quickly, but if you’re wanting to accomplish a darker look, follow the instructions on the can for doing multiple coats. let dry completely, about 6-8 hours.
2. prep the letters. if you’re adding lettering above your frame, now’s the time to get those painted. let dry for a couple hours and add a second coat if needed. once they’re dry, you can add the mounting tape to the back of these. this was probably the most tedious part of the project, since you’ll have to cut the tape to fit on the letters without showing. i overestimated the amount of tape these would need; they actually stick to the wall very well and haven’t fallen down, so you can probably get away with just a couple small pieces of the tape. leave the back of the tape on until you’re ready to place them.
3. determine placement of your frame on desired surface. we wanted ours centered on the large wall, so we made a few marking indicating where the top piece should go, making sure we left enough room above for the lettering we knew we were going to do.
4. screw the wood into the wall. we won’t pretend to know the best process for doing this, but we pre-drilled 8 holes (one on each end of each piece of wood) before putting them up on the wall. then, we took the top piece, screwed one side into the wall, made sure it was level, and held it in place while we screwed in the opposite side. once we had the top piece in, it was easier to make sure the rest of the pieces were on the wall correctly. next, we did the side pieces, and finally the bottom pieces. make sure you continue to check that each piece is level before screwing in the second screw. [for additional security, you can add four additional screws, one on the middle of each piece. this will help prevent the wood from bowing out].
5. mount lettering to the wall. we wanted ours centered with the frame, so we laid out the lettering on the floor first and determined the center of each line, then mounted them starting with the center and working outward. it’s not perfect, but we think it looks pretty good.
6. hang hooks onto inside of frame. again, you might want to pre-drill here, which will make them easier to screw in. if you’re using the same frame dimensions as we did, you can place the hooks on either side at 4″, 12″, 20″, and 28″ to get the look you see in ours. obviously, you’ll want to space them closer together or further apart depending on how large your photos are and how many rows you’re planning on.
7. hang photos! tie twine to one end of the hook, then pull across and tie to the other side. the photos will make it arc down a little bit, so you can hang the twine pretty much straight across (just don’t tie too tight). once all your twine is hung, arrange photos however you’d like using the mini clothespins. we love how we’ll be able to keep changing out the photos as we take more, and you could even update it for specific occasions (i.e. christmas, birthdays, etc.)

hope you enjoyed our little diy project. we’re hoping to add a few more accents to keep sprucing up the bedroom, after which we’ll post a full room tour :) 

Posted in house + home | Tagged , | 1 Comment